

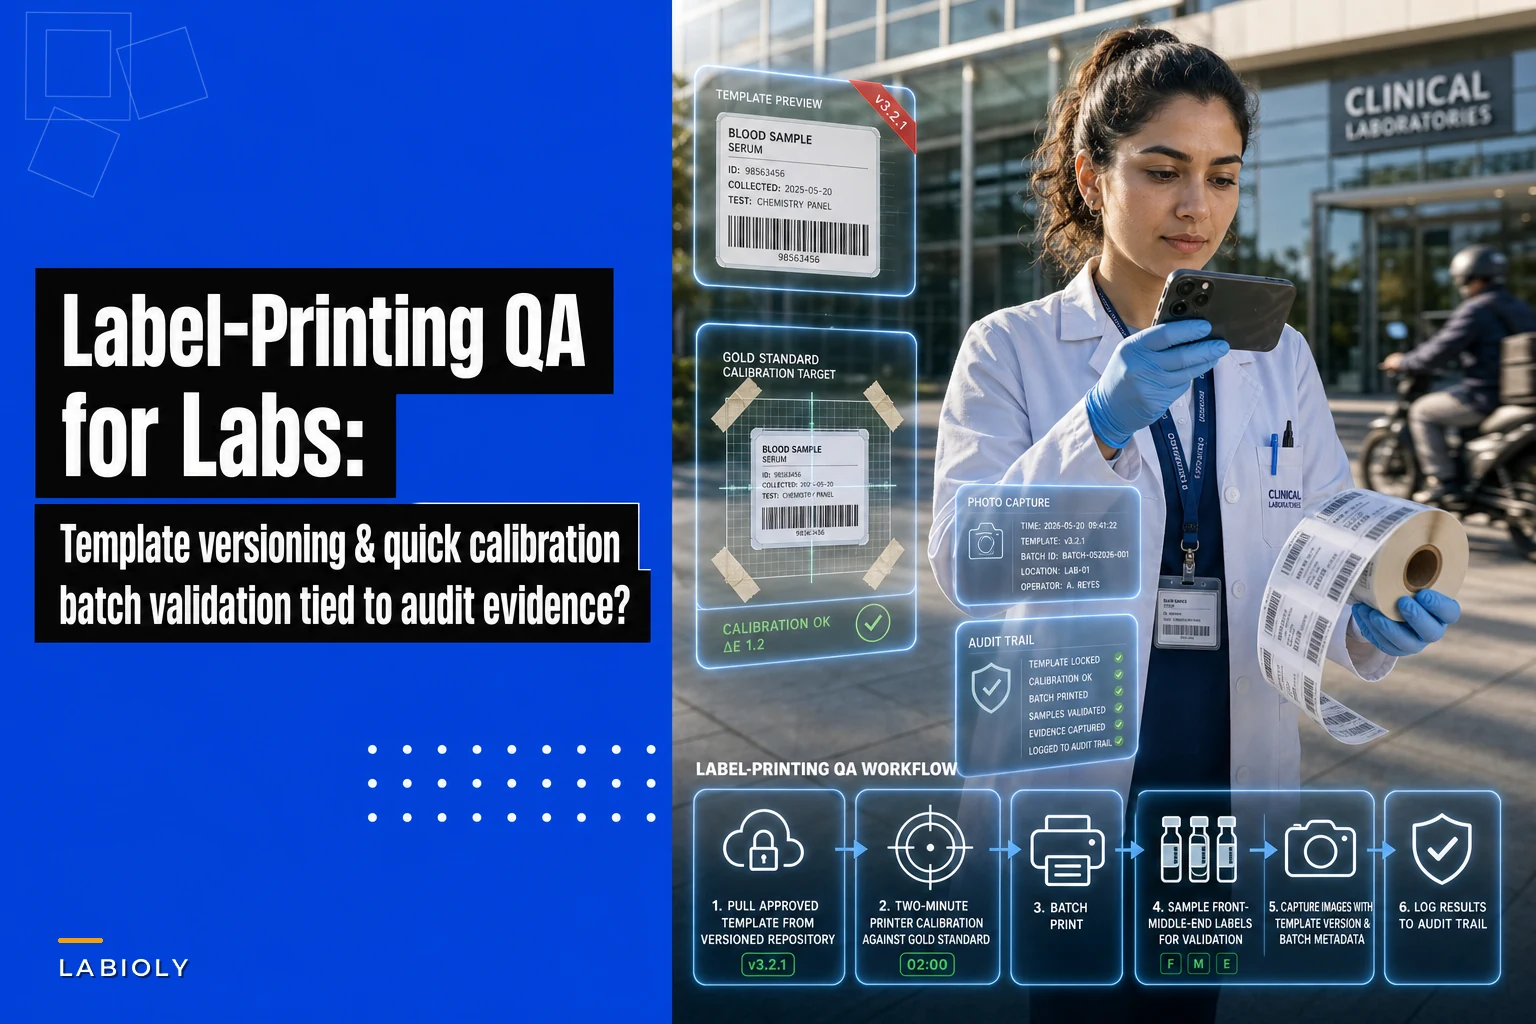

Most labs treat label printing like a printer problem. It isn't. It's a template management and process control problem that happens to end at a printer. The failure mode almost never looks like "the printer broke." It looks like a barcode that scans fine at the bench but not at the freezer, a lot number that shifted half a millimeter and got clipped, or a "corrected" template someone emailed around that three techs never received.
This post is narrow on purpose. It's about the operational QA layer around your label templates: how you version them, how you run a fast printer sanity check before a batch, how you validate a batch before it goes on real samples, and how you tie photographic proof to acceptance criteria so an auditor can trace exactly what got printed and why it passed. Durability testing (freeze/thaw, solvent, autoclave survival) is a separate discipline — if that's your gap, the extreme-conditions label validation guide covers it. Here we assume the label material survives. The question is whether the content and print quality are correct and provable.
The failure that actually costs you
The scenario that burns labs isn't dramatic. A protocol changes — say, a study adds a second aliquot type — and someone updates the label template to add a field. They do it on their own machine, in whatever design tool the printer shipped with. The new template works on their printer. Three weeks later a different tech prints from a different workstation using an older copy of the file, and the aliquot-type field simply isn't there. Nobody notices until reconciliation, because both barcodes scan and both look "right enough."
Now you've got a mixed batch: some vials carry the new field, some don't, and there's no clean way to tell which run produced which. This usually happens because template files live in three places at once — a shared drive, someone's desktop, and the printer software's local library — and none of them is authoritative. There is no version number on the label itself, so you can't look at a printed vial and know which template generated it.
That's the core insight most label QA misses: if the label doesn't carry any trace of which template version produced it, you have no forensic path back. Everything downstream — audit response, deviation investigation, recall scoping — depends on that missing link.
Version your templates like you version SOPs
Template management is document control. Treat it that way and half the chaos disappears.
Eliminate lab bottlenecks and errors.
Labioly helps you monitor, manage, and report lab activities efficiently and compliantly.
- Real-time sample tracking
- Inventory and supply alerts
- Staff workflow coordination
No credit card required
The practical rule is simple: one authoritative template store, sequential version numbers, and a human-readable change reason for every version. What trips labs up is thinking the printer software's built-in "save" is version control. It isn't — it overwrites, it doesn't track why, and it doesn't stop someone from printing yesterday's copy.
| Element | What it holds | Why it matters |
|---|---|---|
| Template ID | Stable identifier (e.g., TPL-CRYO-2ML) | Groups all versions of the same label type |
| Version | Sequential (v4, v5…) | Tells you which iteration is current |
| Encoded version marker | Version embedded in the barcode payload or printed as tiny text | Lets you trace a physical label back to its template |
| Change reason | One line: what changed and the linked change request | Audit evidence + prevents silent edits |
| Effective date | When this version becomes the only approved one | Kills the "old copy still floating around" problem |
| Approver | Who signed off | Ties into your change-control matrix |
The non-obvious piece is the encoded version marker. If you embed the template version into the barcode data string — or even just print it as 5pt text in a corner — every physical label becomes self-documenting. Six months later, when reconciliation flags a weird batch, you scan one vial and instantly know it came from TPL-CRYO-2ML v4, which you retired in March. That single design decision turns a two-day investigation into a two-minute one.
One mistake to avoid: don't version the design separately from the data mapping. If v5 changed which LIMS field feeds the "collection date" position, that mapping change needs to live in the same version record. Labs that version the visual layout but not the field mapping end up with correct-looking labels pulling from the wrong source.
The quick printer-check SOP (before every batch, not once a quarter)
Calibration drift on thermal-transfer and direct-thermal printers is gradual and boring, which is exactly why it gets skipped. The printhead ages, ribbon tension shifts, the platen wears, and print quality degrades a little each week. You don't notice until a barcode's narrow bars smear into the wide ones and the scanner starts failing.
The fix isn't a heavy calibration procedure. It's a two-minute check that runs before any batch of consequence. The goal is to catch a bad printer before you've committed 200 vials to it.
A printer-check SOP that's fast enough that people will actually do it:
-
Print one reference label from a fixed test template (not the production template — a dedicated
TPL-CHECKwith a known barcode and a fine-line grid). -
Scan the reference barcode twice — once flat, once at the angle your techs actually hold vials. First-read success on both is the pass bar.
-
Check the fine-line grid for smearing or dropout. This surfaces printhead and darkness issues the barcode alone might tolerate.
-
Confirm print darkness/contrast matches the reference sample taped inside the printer cabinet. Eyeballing against a physical gold-standard beats trusting a number on the screen.
-
Log pass/fail with the operator and timestamp. A fail routes to the printer remediation path, not to "print anyway and hope."
The pattern worth stealing here is the physical gold-standard label taped near each printer. A printed reference from the day the printer was known-good gives techs an instant visual comparison. Darkness settings drift in software; a taped reference doesn't lie. Labs that rely only on the on-screen darkness value miss slow degradation because the setting reads the same while the output gets worse.
Tape the gold-standard label inside the printer cabinet where it's visible every time the cabinet is opened.
When a full calibration is overkill
Not every print job needs the batch-validation treatment below. A single label to re-mark a box doesn't warrant it. The quick check makes sense before any run going onto real samples, or anything destined for long-term storage or regulated study material. For one-off internal labels, the two-minute printer check alone is enough.
Batch test prints and acceptance criteria
The batch validation step exists to answer one question: is this specific run, from this specific printer, using this specific template version, good enough to commit to samples? You're not testing the template design in the abstract — you tested that when you approved the version. You're testing this instance of printing.
A batch test print means pulling a small number of labels from the front, middle, and end of the intended run and validating them against explicit acceptance criteria. Front-middle-end matters because ribbon and heat behavior can drift within a long run — the first label and the 300th label aren't always identical.
-
Barcode first-read rate every sampled label scans on the first attempt, in two orientations, on the actual scanner model used at the bench.
-
Grade threshold if you have a verifier, minimum barcode grade of C (or your standard) — not just "scannable," which tolerates near-failures.
-
Human-readable check the printed lot, date, and sample ID exactly match the source record for that label. No truncation, no clipping at the edges.
-
Version marker present and correct the encoded template version matches the approved current version.
-
Registration text and barcode sit inside the printable area with margin — no drift toward the edge that a slightly-off vial diameter would clip.
The mistake labs make with acceptance criteria is writing them as pass/fail on the whole batch without defining the sample size or the response to a single failure. Define both. A reasonable rule: sample 5 labels per run (or more for long runs), and any failure stops the batch and triggers a printer check before reprinting. One bad label in the sample means the run is suspect, not "4 out of 5, ship it."
Photographic validation tied to audit evidence
This is the part that separates a QA process you do from a QA process you can prove. An auditor doesn't want to hear that you check labels. They want to see that batch #4471, printed on 12 March from Printer-B using TPL-CRYO-2ML v5, passed acceptance criteria — and they want the evidence attached to that assertion.
Photographic validation means capturing an image of the sampled labels as part of the batch record. Not a vague "we photograph labels" policy — a specific, repeatable capture that shows the barcode, the human-readable text, and enough context to tie it to the run.
What makes a label photo actually count as evidence:
-
In the frame the barcode, the human-readable fields, and the printed version marker, all legible.
-
Traceable the image filename or metadata carries the batch ID, printer ID, template version, and timestamp — otherwise it's just a picture of a label with no chain back to the run.
-
Paired with the criteria result the photo sits next to the pass/fail record and the scan result, not in a separate photo folder nobody links.
-
Consistent capture conditions same distance, same lighting where possible, so degradation is visible across time if you ever compare runs.
A photo without linked metadata is nearly worthless as evidence. Investigators see a folder of label pictures and can't map any of them to a specific batch or template version, so the whole thing gets waved off as "photos, but no traceability." The evidence value lives almost entirely in the linkage — batch, printer, version, timestamp, result — not in the image itself.
This is where a lot of manual QA quietly falls apart. The check gets done, someone snaps a phone photo, and it ends up in a camera roll with no batch reference. Six months later it's unfindable. If your batch records live in a workflow system, the practical move is to capture the photo inside the batch record so the linkage is automatic rather than something a busy tech has to remember to type. The point isn't the tooling — it's that the evidence and the run are joined at the moment of capture, not reconstructed later from memory.
A real scenario
A mid-sized academic core facility printing cryo labels for a multi-site study ran into exactly the silent-version problem. They had one template type, three printers across two rooms, and template files copied onto four workstations. Over about two months, a field-position change made on one machine never propagated. Roughly 15% of a several-hundred-vial batch printed with the collection date and lot number transposed in the barcode payload — visually fine, human-readable text correct, but the encoded data wrong. It scanned clean into the LIMS with swapped fields.
The problem surfaced at reconciliation, weeks after the vials were in the freezer. Untangling which vials came from which workstation copy took the better part of two days, plus a partial re-inventory, because nothing on the labels told them which template produced what.
The fixes were unglamorous: a single authoritative template store, sequential versions with the version encoded into the barcode payload, the two-minute printer check before each print session, and a five-label front-middle-end validation with a photo captured against acceptance criteria and linked to the batch. After that, the next time a template changed, the encoded version marker meant any stray old-version label was identifiable on sight. The recurring "which copy did this come from" question just stopped happening. Reconciliation exceptions tied to labels dropped to near zero over the following quarter.
The lesson wasn't "buy a better printer." Their printers were fine. The problem was that a physical output with no version trace and no authoritative source is an investigation waiting to happen.
Who should skip most of this
If you print a handful of labels a week, all from one workstation, one printer, one person — the full batch-validation-plus-photographic-evidence apparatus is more overhead than it's worth. Do the quick printer check, keep one authoritative template, and move on. The heavier QA earns its keep when you have multiple printers, multiple operators, regulated or long-retention samples, or multi-site studies where a mismatched template can't be caught by whoever happens to know the label by heart.
Likewise, if your labels never carry encoded data — purely human-readable, read by people, never scanned — the barcode-grade criteria don't apply. Focus your acceptance criteria on legibility, registration, and version marking instead.
Putting it together
The whole workflow is a short loop, run per print session: pull the current approved template from the single authoritative store, run the two-minute printer check against the taped gold-standard, print the batch, sample front-middle-end against explicit acceptance criteria, photograph the samples with the batch and version linkage, and log the result. A pass commits the batch to samples; a fail stops it and routes to printer remediation before anything touches a vial.
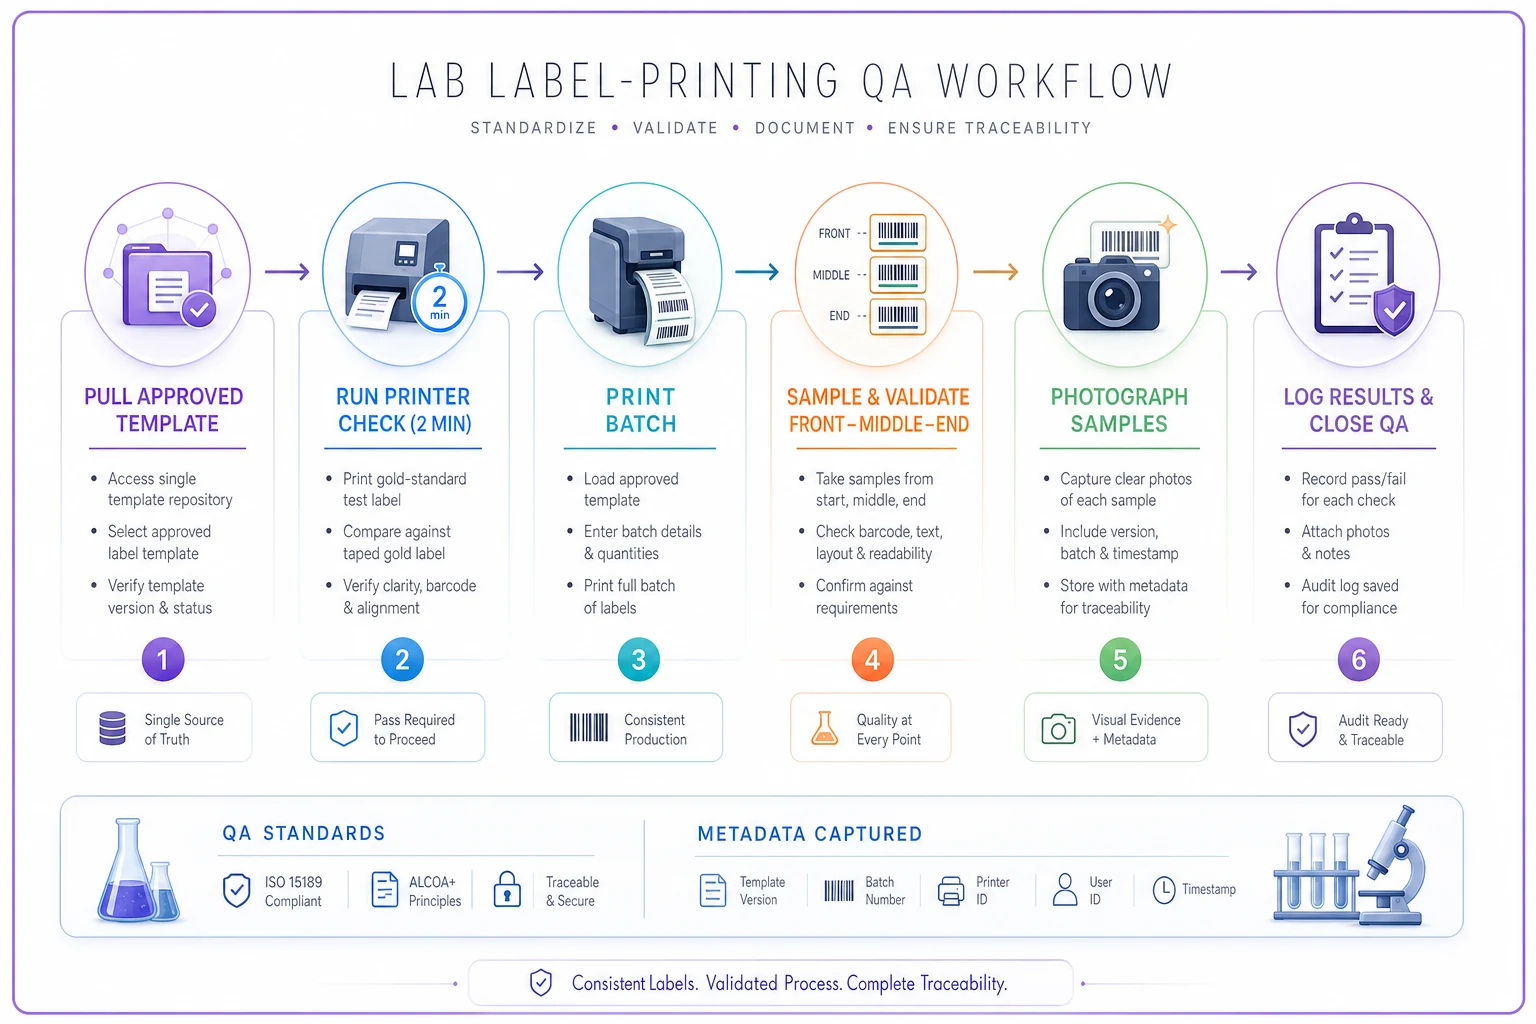
The diagram illustrates that short loop and the points where the encoded version marker is checked and recorded.
None of these steps is heavy on its own. What makes them work together is the version marker threading through all of them — encoded in the barcode, checked in validation, visible in the photo, recorded in the log.
That single thread is what lets you answer, months later and under audit pressure, the only question that ever really matters: which template printed this label, and how do you know it was good?
Ready to upgrade your lab operations?
Join 500+ labs using Labioly to save time, reduce errors, and enhance productivity and compliance.