

You know that sinking feeling when you pull a rack from the -80°C freezer and half the labels are peeling off? Or worse, when you're halfway through an autoclave cycle and realize nobody validated whether these new labels can handle 121°C for 30 minutes. Label failures in research labs aren't just annoying—they're compliance nightmares that can invalidate entire studies.
Most labs discover their label durability issues at the worst possible moment. A PI once told me about losing track of 200 patient samples because xylene exposure during histology processing completely dissolved the adhesive on their cryolabels. The samples weren't lost, but reconstructing their identity took three technicians two weeks of detective work through lab notebooks and LIMS records.
The problem isn't that good labels don't exist. Labs rarely validate label durability systematically before committing to a label/printer/adhesive combination for critical samples. They trust vendor specs that say "freezer-safe" without testing what happens after 20 freeze-thaw cycles. They assume "chemical-resistant" means resistant to their specific solvent exposure conditions.
Why Standard Label Testing Falls Short
Vendor spec sheets give you starting points, not guarantees. A label rated for -80°C storage might work perfectly in a static freezer but fail after repeated temperature cycling between -80°C and room temperature. The adhesive chemistry that survives ethanol exposure might dissolve in DMSO. Print that looks crisp today might fade to illegibility after six months of cold storage.
Labs learn these lessons expensively. A genomics core switched to cheaper labels that seemed identical to their previous brand. Six months later, they discovered the new labels' adhesive became brittle at ultra-low temperatures—not immediately, though. It took around 100 days of cold storage before the embrittlement became severe enough to cause real failures. By then, thousands of samples were already labeled and stored.
The validation gap happens because label testing feels overwhelming without clear direction. How many freeze-thaw cycles should you test? Which solvents? What temperature ranges? Without defined protocols, labs either skip validation entirely or run incomplete tests that miss critical failure modes.
What works is a focused validation protocol that tests the specific conditions your labels will face, with clear pass/fail criteria and documentation that satisfies both your QA team and auditors.
Building Your Label Validation Protocol
Start by mapping your actual use conditions—not theoretical worst cases, but the real conditions your labels experience. If your sample workflow includes five freeze-thaw cycles maximum, test for seven. If your labels might contact 70% ethanol during routine handling, include that in your solvent panel.
Eliminate lab bottlenecks and errors.
Labioly helps you monitor, manage, and report lab activities efficiently and compliantly.
- Real-time sample tracking
- Inventory and supply alerts
- Staff workflow coordination
No credit card required
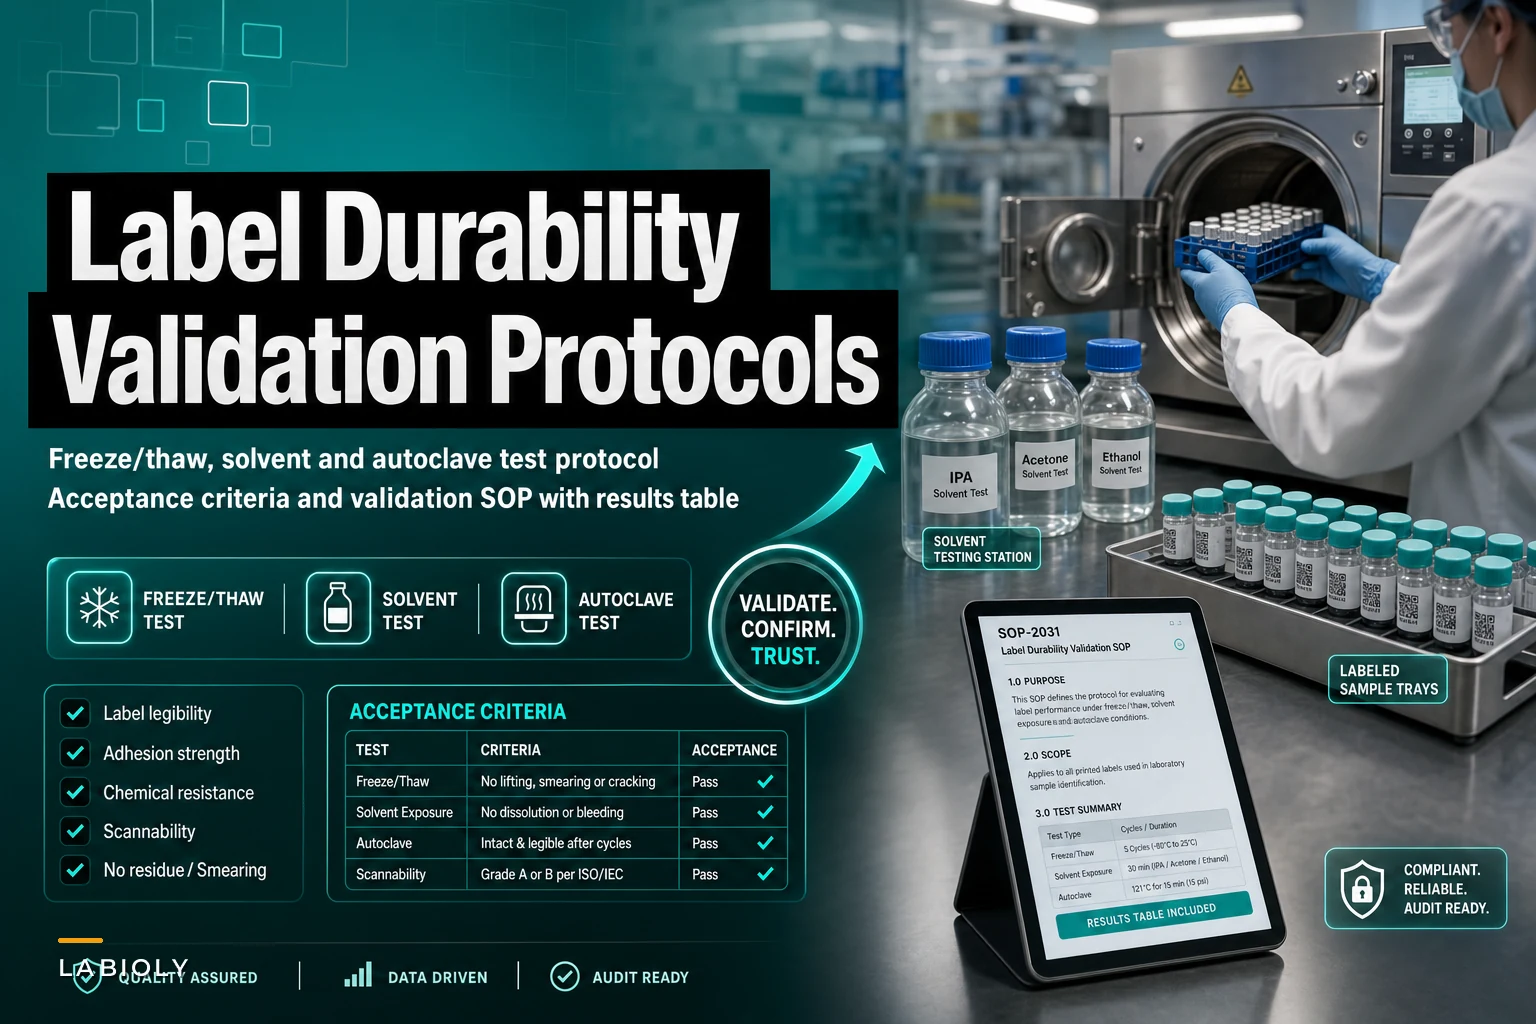
The protocol should cover three domains: temperature cycling, chemical exposure, and sterilization resistance. Each needs specific test parameters, acceptance criteria, and documentation requirements.
Temperature Cycling Protocol
Your freeze-thaw testing should mirror actual sample handling patterns. Most protocols use this framework:
Test Setup:
-
Label 10 test tubes/plates per label-printer combination
-
Fill containers with water (mimics sample volume thermal mass)
-
Apply labels according to manufacturer specifications
-
Allow 24-hour cure time at room temperature
Cycling Parameters:
-
Cycle 1-5
-80°C for 24 hours → room temperature for 2 hours
-
Cycle 6-10
-80°C for 24 hours → 37°C water bath for 30 minutes
-
Cycle 11-15
-80°C for 24 hours → dry ice transport simulation (-78°C for 4 hours) → room temperature
Document observations after cycles 1, 5, 10, and 15. Look for adhesive lifting at edges, barcode degradation, text fading, and substrate cracking.
Chemical Resistance Testing
Solvent exposure testing requires careful selection of your test panel. Here's a practical matrix based on common lab workflows:
| Solvent | Concentration | Exposure Method | Duration | Evaluation Point |
|---|---|---|---|---|
| Ethanol | 70% | Direct immersion | 30 min | Immediate + 24hr |
| Isopropanol | 70% | Direct immersion | 30 min | Immediate + 24hr |
| Methanol | 100% | Direct immersion | 5 min | Immediate + 24hr |
| Xylene | 100% | Surface contact | 10 min | Immediate + 24hr |
| DMSO | 10% | Surface contact | 2 hours | Immediate + 24hr |
| Bleach | 10% | Spray + wipe | 1 min | Immediate + 24hr |
| Acetone | 100% | Surface contact | 30 sec | Immediate only |
Apply labels to glass slides for testing—glass gives you an inert, consistent substrate. After exposure, try to remove labels by rubbing with a gloved finger for 10 seconds. Labels that remain fully adhered with legible text pass.
Autoclave Validation
Autoclave testing reveals both adhesive and substrate limitations quickly. Standard gravity cycles at 121°C for 30 minutes work for most validations, but include a 134°C prevac cycle if your lab uses both methods.
Test both dry and wet conditions. Labels on the outside of containers see different conditions than labels that might contact condensation. That distinction matters—a lab's allegedly autoclave-safe labels worked perfectly on dry glassware but delaminated when condensation formed during the exhaust phase.
Apply labels to both glass and plastic substrates, since thermal expansion differences affect adhesive performance. Run three complete cycles with cooling between runs. Document any edge lifting, discoloration, or text degradation after each cycle.
Acceptance Criteria That Actually Matter
Generic pass/fail criteria lead to ambiguous results. Your acceptance criteria need numerical thresholds and specific evaluation methods.
Primary Acceptance Criteria:
-
Barcode readability
100% first-pass scan rate with standard reader
-
Text legibility
12-point font readable at 30cm distance under standard lab lighting
-
Adhesion
No edge lifting >1mm after specified test conditions
-
Substrate integrity
No cracking, tearing, or delamination visible at 2X magnification
Secondary Acceptance Criteria:
-
Color retention
<20% fading by densitometer measurement (if color-coding used)
-
Dimensional stability
<2% shrinkage in any dimension
-
Repositioning capability
Labels removable without residue if required by workflow
These criteria connect directly to operational requirements. A label that's "mostly attached" might seem fine until you realize that 1mm of edge lifting allows moisture ingress that degrades the adhesive over months of storage.
Validation SOP: From Testing to Documentation
A validation SOP transforms ad-hoc testing into reproducible, audit-ready evidence. Here's a condensed version covering the essentials:
SOP-LAB-VAL-001: Label Durability Validation
Purpose: Establish validated label/printer/adhesive combinations for specific laboratory workflows
Scope: All labels used for sample identification in regulated workflows
Responsibilities:
-
Lab Manager
Approve validation protocol and final selections
-
QA Representative
Review test documentation and acceptance criteria
-
Technician
Execute validation tests and document results
Procedure:
-
Preparation Phase — Define use conditions based on sample workflow analysis, select 3-5 candidate label/printer combinations, prepare test matrices for each condition set, and establish lot traceability for test materials.
-
Execution Phase — Run temperature cycling protocol (document per cycle), complete chemical resistance matrix (photograph results), perform autoclave testing if applicable, and record all deviations from protocol.
-
Evaluation Phase — Compare results against acceptance criteria, calculate pass rates for each test condition, document any borderline results with photographic evidence, and generate a summary recommendation matrix.
-
Approval and Implementation — Present validation summary to stakeholders, obtain documented approval for selected combinations, update purchasing specifications, and archive the validation package for audit trail.
The key difference between this SOP and generic templates is that it explicitly links test conditions to your actual workflows and includes photographic documentation requirements that prove compliance during audits.
Results Documentation That Survives Audits
Your validation generates data that needs clear presentation. A results matrix provides the overview; detailed test records provide traceability.
Summary Validation Matrix
| Label/Printer Combo | Freeze-Thaw (15 cycles) | EtOH 70% | IPA 70% | Xylene | Autoclave 121°C | Overall Status |
|---|---|---|---|---|---|---|
| CryoLabel A + Printer 1 | PASS (15/15) | PASS | PASS | FAIL | N/T | Approved for non-xylene |
| ToughTag B + Printer 1 | PASS (14/15) | PASS | PASS | PASS | PASS | Approved for all uses |
| GenericLabel C + Printer 2 | FAIL (8/15) | PASS | FAIL | FAIL | FAIL | Rejected |
| ChemLabel D + Printer 1 | PASS (15/15) | PASS | PASS | PASS | FAIL | Approved for non-autoclave |
| CryoLabel A + Printer 3 | FAIL (3/15) | PASS | PASS | N/T | N/T | Rejected |
This format immediately shows which combinations work for which workflows. During audits, you can quickly demonstrate that label selection was based on documented testing, not assumptions.
Detailed Test Records
Each cell in your summary matrix needs supporting documentation. Create test sheets that capture:
-
Date and technician initials for each test point
-
Environmental conditions (temperature, humidity) during testing
-
Lot numbers for all materials
-
Photographs of any failures or borderline results
-
Deviations from protocol with justification
One pharmaceutical research lab got flagged during an FDA audit because their label validation didn't include humidity measurements during testing. The labels had passed everything, but the auditor questioned whether results were valid without controlling for ambient conditions. Environmental monitoring belongs in every validation protocol now, even when it seems like overkill.
Implementation Strategy After Validation
Validation data means nothing if your lab doesn't systematically implement the results. Create a qualified supplier list that specifies exact product numbers, not just brand names. That "CryoLabel" that worked might come in twelve variants with different adhesives.
Set up your purchasing system to flag non-validated labels. Validated label programs fall apart when someone orders a cheaper alternative that looks identical but uses different adhesive chemistry. By the time anyone notices, thousands of samples are already labeled.
Train your team on label application technique too. Surface preparation matters—many cryolabels require completely dry, room-temperature surfaces for proper adhesion. Labels applied to frost-covered tubes never achieve full adhesive bond, regardless of label quality.
Managing Label Changes and Revalidation
Your validated label system needs change control procedures. Vendors reformulate adhesives, discontinue products, or "improve" substrates without notification. Regular revalidation catches these changes before they affect critical samples.
Set up a simple change control trigger list:
-
New lot numbers with different appearance or texture
-
Vendor notification of any formulation change
-
Observed performance issues during routine use
-
Changes to sample storage conditions
-
Introduction of new solvents or cleaning agents
When Avery Dennison discontinued a popular cryolabel series, labs scrambled to find replacements. Those with documented validation protocols simply ran their tests on alternative products. Those without validation data had to guess, which led to expensive failures.
Common Validation Mistakes to Avoid
Testing at wrong temperatures: Don't test -80°C labels in a -20°C freezer. Adhesive chemistry behaves differently at ultra-low temperatures.
Insufficient cure time: Most adhesives need 24-48 hours to fully cure. Testing immediately after application misses adhesive development entirely.
-
Testing at wrong temperatures Don't test -80°C labels in a -20°C freezer. Adhesive chemistry behaves differently at ultra-low temperatures.
-
Insufficient cure time Most adhesives need 24-48 hours to fully cure. Testing immediately after application misses adhesive development entirely.
-
Single-point testing One freeze-thaw cycle doesn't predict performance after 20 cycles. Adhesive fatigue accumulates over time.
-
Ignoring substrate differences Labels validated on polypropylene tubes might fail on polystyrene plates. Test on your actual labware.
-
Missing interaction effects Ethanol exposure might not affect a label alone, and freeze-thaw might not either—but ethanol exposure followed by freezing can cause complete failure. Test combined conditions.
Test combined conditions.
Streamlining Validation Workflows
Manual tracking of validation tests across multiple label types, test conditions, and acceptance criteria creates documentation gaps. You're managing dozens of test points, environmental measurements, and photographic evidence across multiple validation runs—things slip.
This is where proper chain-of-custody documentation becomes essential. Your validation samples need the same traceability as your research samples. Each test panel should have documented handoffs between preparation, testing, and evaluation phases.
Modern lab operations platforms can centralize validation workflows by automating test scheduling, result capture, and report generation. Instead of manually tracking which labels have completed which test cycles, automated workflows ensure every validation follows the same protocol with consistent documentation. The platform flags when acceptance criteria aren't met, compiles photographic evidence with proper metadata, and generates validation reports that link directly to your change control system.
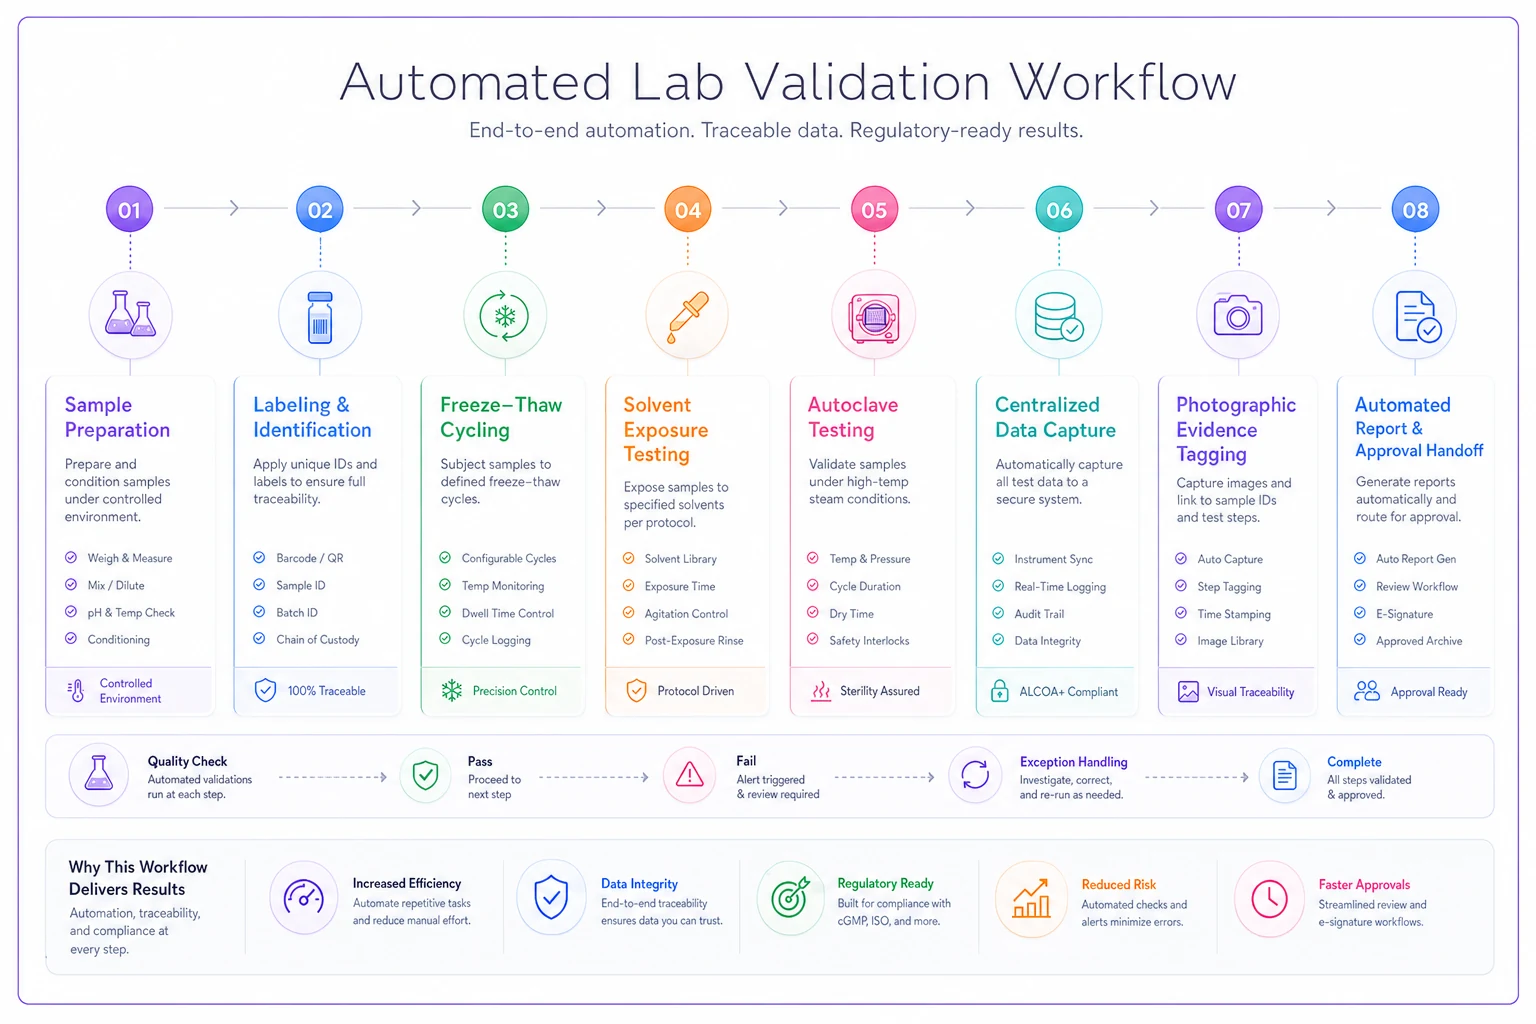
A simple visual like this helps teams follow the exact steps and handoffs in the protocol.
Practical Validation Timeline
A complete label validation takes roughly two weeks of active testing, though calendar time stretches to three or four weeks once you factor in cure times and documentation.
Week 1:
-
Days 1-2
Protocol preparation and material procurement
-
Day 3
Label application and start cure period
-
Days 4-5
Begin freeze-thaw cycling
Week 2:
-
Days 6-10
Continue freeze-thaw, run chemical resistance tests
-
Days 11-12
Autoclave testing (if required)
Week 3:
-
Days 13-15
Final evaluations and documentation
-
Days 16-17
Results compilation and review
-
Days 18-20
Approval and implementation planning
This assumes you're validating 3-5 label combinations simultaneously. Running them serially stretches the timeline but reduces technician burden.
When to Outsource Validation
Some labs benefit from outsourced validation, particularly when facing resource constraints or requiring specialized testing. Consider outsourcing when:
-
You need GLP-compliant validation documentation
-
Your test requirements exceed in-house capabilities (extreme temperatures, specialized solvents)
-
Validation frequency doesn't justify maintaining internal expertise
-
Regulatory requirements demand third-party validation
Contract testing labs charge roughly $5,000-15,000 for comprehensive label validation, depending on test complexity and documentation requirements. Compare that against internal costs: technician time, materials, equipment access, and the opportunity cost of delayed implementation.
Building Label Durability Into Your QA System
Validated labels become part of your broader quality system. Include label verification in receiving inspection, checking that delivered products match validated specifications. During internal audits, verify that only validated label combinations are in active use.
Track label performance metrics over time. If validated labels start showing unexpected failures, investigate whether storage conditions, application techniques, or vendor quality has shifted. One genomics lab found their validated labels failing because a new freezer had excessive frost buildup, creating an ice layer that prevented proper adhesion.
Connect label durability validation to your reagent forecasting systems as well. Just as you plan for reagent availability, plan for label inventory based on validated shelf life and storage conditions. Some adhesives degrade over time even in unopened packages, particularly if stored at inappropriate temperatures.
The Real Cost of Label Failures
Poor label durability creates cascading operational problems. When labels fail, you're not just replacing labels—you're investing technician time in sample identification, risking regulatory findings, and potentially invalidating study data.
A single mislabeled sample in a clinical trial can trigger:
-
Immediate protocol deviation documentation
-
Root cause analysis investigation
-
CAPA implementation
-
Potential FDA 483 observation
-
Subject safety evaluation if patient samples are affected
-
Statistical analysis complications if the sample gets excluded
Validation prevents these scenarios. The two weeks spent validating labels saves months of recovery effort when failures occur. More importantly, it protects your research integrity and regulatory standing.
Label durability validation isn't busywork—it's operational insurance that protects your most valuable asset: your samples. Labs that implement systematic validation avoid the crisis meetings, emergency reprocessing, and compliance nightmares that come with using untested labels.
The protocol and acceptance criteria outlined here provide a solid starting framework. Adapt them to your specific workflows, but keep the systematic approach. Your future self—and your auditor—will thank you when every label stays attached, readable, and compliant through whatever conditions your research demands.
Ready to upgrade your lab operations?
Join 500+ labs using Labioly to save time, reduce errors, and enhance productivity and compliance.