

Most labs don't fail resilience during a disaster. They fail it in the ninety minutes after, when three people are texting each other trying to remember which freezer holds the irreplaceable samples, who has the vendor's after-hours number, and whether anyone wrote down the temperature when the alarm went off.
The equipment usually behaves better than the coordination around it. A -80 holds temperature longer than people expect. A UPS buys you real minutes. Vendors do answer the phone. What breaks is the connective tissue — nobody agreed ahead of time what "critical" means for each asset, what the recovery target actually is, how often the fallback gets tested, or what evidence needs to exist by the time the incident closes. That gap is what a real laboratory operational resilience framework is supposed to address. Not the individual playbooks, but the layer above them that makes those playbooks consistent with each other.
This piece is the pillar. It maps your assets into tiers, ties each tier to a redundancy SLA, assigns a test cadence, defines prioritized transfer logic, and standardizes the incident-evidence bundle so every event produces the same defensible record. The narrower playbooks — freezer outages, vendor governance, data integrity — hang off this structure.
Why resilience programs drift into inconsistency
The pattern is almost always the same. A lab reacts to one bad event. A freezer fails, someone loses a cohort, and suddenly there's a freezer plan with alarm thresholds, a call tree, and a backup unit. Good. Then two years later a network switch dies during an instrument run and there's no equivalent plan, so people improvise. Then a reagent supplier goes on backorder and the scramble looks nothing like either of the first two responses.
Each response was competent on its own. Collectively they're a mess. Three assets, three different definitions of "urgent," three different escalation paths, and three completely different sets of paperwork afterward. When an auditor or sponsor asks you to show how the lab handles infrastructure failures, there's nothing coherent to hand them.
Resilience gets built bottom-up, one incident at a time, when it actually needs a top-down spine to hold it together. The spine is boring and administrative, which is exactly why it never gets built until someone forces it. Tiering, SLA mapping, evidence standards — without those three, you have a pile of playbooks, not a framework.
Start with asset tiers, not asset lists
A flat inventory of critical equipment is nearly useless for resilience decisions. Everything looks important on a list. The work is deciding how important, and against what failure mode, because a freezer and a network switch fail in completely different ways and on completely different clocks.
Eliminate lab bottlenecks and errors.
Labioly helps you monitor, manage, and report lab activities efficiently and compliantly.
- Real-time sample tracking
- Inventory and supply alerts
- Staff workflow coordination
No credit card required
| Tier | Domain examples | Time-to-irreversible-loss | Redundancy SLA target | Who gets called |
|---|---|---|---|---|
| T1 — Catastrophic | -80 holding unique/irreplaceable samples; cryo storage; primary power to those units | Minutes to a few hours | Automatic failover + hot backup capacity always reserved; RTO under 1 hr | PI + facilities + vendor, in parallel, immediately |
| T2 — Severe | -20/4°C stock with replaceable-but-costly material; UPS-backed instrument clusters; primary network path to LIMS | Several hours to ~1 day | Warm backup, staged transfer plan, RTO under 4 hrs | Lab manager + facilities, escalate to PI if not resolved in window |
| T3 — Disruptive | Ambient reagent storage; secondary instruments; internet/WAN for non-critical uploads | 1–3 days | Documented manual workaround, RTO under 24 hrs | Lab manager, next-business-day vendor |
| T4 — Tolerable | General consumables; office IT; non-critical printers | Days to weeks | Best-effort, standard procurement | Whoever owns the area |
The single most common mistake here is tiering by dollar value. A $40k instrument that can sit dead for a week without harming a sample is T3. A single box of patient-derived samples with no backup, sitting in an aging -80, is T1 regardless of what the freezer cost. Tier by consequence and by the clock, not by the purchase order.
The second mistake is treating an entire domain as one tier. Your cold storage isn't "T1." Some of it is T1, most is probably T2, and a chunk is T3. The tier lives at the contents level, which means sample mapping and resilience tiering have to talk to each other — and that conversation needs to happen more than once.
Map each tier to a redundancy SLA you can actually meet
An SLA you can't test is just a wish written down. Every tier needs a redundancy commitment with a concrete recovery target and a concrete resource behind it.
-
RTO (recovery time objective) — how long until the asset or a substitute is functioning. For T1 cold storage that's measured in tens of minutes, which means the backup capacity has to already exist and already be cold.
-
RPO-equivalent (loss objective) — for physical assets this is "how much material can you afford to lose." For T1 it's zero, which forces the hot-backup requirement.
-
The reserved resource — the actual thing that makes recovery possible. Empty backup freezer space held at temperature, a spare switch on the shelf, a second qualified vendor with a standing agreement. If the resource is theoretical, the SLA is theoretical.
-
The trigger condition — the exact reading or event that starts the clock. An alarm at a threshold, a ping failure lasting X minutes, a vendor confirming a backorder over N days.
The reserved-resource line is where most programs quietly fail. A lab will write "RTO 1 hour" for its most critical freezer and have no reserved backup space anywhere in the building that's actually empty and cold. When the failure comes, the first hour goes to frantically dumping other people's samples to make room, which blows the RTO and creates a second incident. If you claim a one-hour recovery, the destination needs to already be ready.
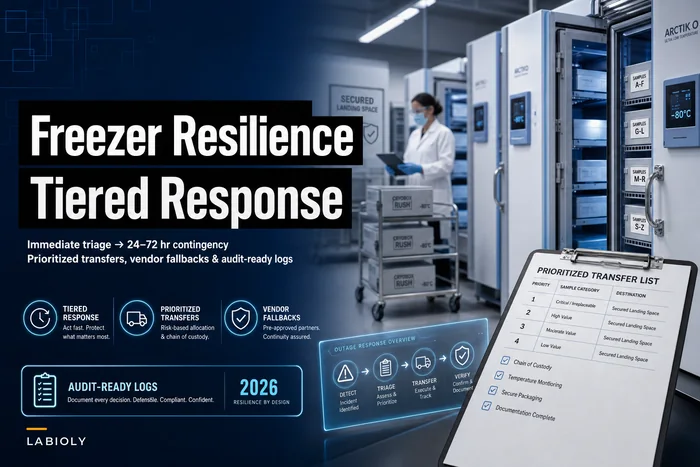
For the freezer-specific mechanics of staged transfers and vendor fallbacks, the detailed procedures live in the Freezer Resilience Playbook — this framework just decides which freezers deserve which SLA and holds them accountable to it.
Test cadence: the part everyone skips
A redundancy that has never been exercised is a rumor. The generator that "should" carry the load, the failover network path that "should" reroute, the vendor who "should" deliver in 24 hours — you don't actually know until you've run it.
| Tier | Test type | Cadence | What "pass" means |
|---|---|---|---|
| T1 | Full failover drill (simulated freezer loss, live transfer to backup) | Quarterly | Transfer completed within RTO, temps logged continuously, evidence bundle generated |
| T1 | Power failover (transfer to generator/UPS under load) | Quarterly | Critical units stay powered through the switch, no gap in monitoring |
| T2 | Partial drill or tabletop with one live element | Semi-annually | Team executes the transfer list correctly, warm backup confirmed available |
| T2 | Network path failover | Semi-annually | LIMS/instrument connectivity restored within window |
| T3 | Tabletop / procedure walkthrough | Annually | Team can locate and follow the workaround SOP |
| Vendor (all tiers) | Contact + response verification | Semi-annually for T1/T2 vendors | Vendor answers, confirms current lead time, contact details still valid |
Two things about cadence that people consistently get wrong.
First, tabletop exercises are not a substitute for at least one live element on T1 assets. You learn nothing about your generator's actual behavior under load by talking about it in a conference room. At least once a year, something has to physically move or physically switch over. The number of labs that discover their "backup freezer" has a dead compressor during a real outage — entirely because it was never turned on and loaded during a drill — is higher than it should be.
Second, vendor verification decays fastest and gets tested least. The after-hours number changes, the account rep leaves, the "guaranteed" lead time quietly slips from 24 hours to five days during a supply crunch. Semi-annual verification of your critical vendors catches this before it matters. The broader structure for scoring and governing those relationships sits in Procurement and Vendor Governance for Critical Lab Supplies, and the resilience framework simply pulls the tier assignment from there so a T1 vendor gets T1 test frequency.
Prioritized transfer lists: decide before the alarm, not during it
When a T1 freezer fails and your backup can only hold 60% of its contents, someone has to choose what moves first. If that choice happens live, at 2 a.m., under stress, it will be wrong. The prioritized transfer list makes the decision in advance.
-
Irreplaceability — can this material be regenerated at all? Patient-derived samples, unique clones, one-of-a-kind isolates go first because there is no second chance.
-
Time-to-degradation at the failing temperature — among irreplaceable items, what degrades fastest as the freezer warms? That sets the order within the top tier.
-
Project criticality / regulatory hold — samples under legal hold or tied to an active regulated study jump the queue over otherwise-equal items.
The output is a physical, printed, laminated list posted on or near the unit, keyed to rack positions, so the person doing the moving reads "Rack A1–A4 first, then C2, then everything in the top two shelves." Not a spreadsheet buried in a shared drive nobody can reach when the network is also down.
A translational lab ran a T1 drill on their primary -80, which held roughly 4,200 vials across mixed projects. Backup capacity available in-building at temperature: around 2,500 vials' worth. Their old plan was "move the important stuff." In the drill, it took the team close to 40 minutes just to decide what counted as important, and they still left two boxes of irreplaceable patient samples for last because those racks were physically hardest to reach. Under a real warming curve, those samples would have been the ones at risk.
After building a proper prioritized transfer list keyed to rack positions, the second drill moved the top-priority ~900 irreplaceable vials in under 15 minutes with zero decision-making at the point of action. The improvement wasn't speed of hands — it was the removal of thinking from the critical path.
The unified incident-evidence bundle
Here's the piece that turns a collection of playbooks into an auditable program: every incident, regardless of which asset failed, produces the same evidence bundle. Same structure, same fields, same artifacts. That consistency is what lets you hand an auditor one template and say "we do this every time," and it's what lets you compare incidents to each other and actually find patterns.
A resilient lab treats the evidence bundle as a required output of the response, not an afterthought. If the incident isn't documented to standard, the incident isn't closed. That one rule changes behavior more than any amount of training.
What goes in every bundle
-
Incident header — unique ID, asset(s) affected, tier, date/time detected, date/time of trigger event, who detected it and how (alarm, manual, monitoring alert)
-
Timeline log — timestamped sequence of every action, with the person who took it. This is the spine; everything else references it.
-
Environmental data — continuous temperature/power/connectivity readings across the event, exported from monitoring, not typed from memory
-
Decision record — which SLA applied, what the transfer list dictated, any deviations from the plan and why
-
Communications log — who was contacted, when, response times, vendor ticket numbers
-
Impact assessment — material affected, material lost (if any), samples transferred, downstream projects notified
-
Recovery confirmation — asset restored or substitute confirmed, RTO actual vs. target, sign-off
-
Root cause + CAPA reference — link to the corrective action, not the full CAPA (that lives in its own system)
The timestamped timeline and the exported environmental data are the two artifacts auditors and sponsors actually scrutinize, and they're the two most often reconstructed from memory afterward — which is exactly why they don't hold up. If your temperature record for the incident window is someone's recollection instead of a continuous export, you don't really have evidence. This connects directly to how you architect and retain that data; the schemas and retention patterns that make bundles defensible are covered in the Operational Laboratory Data Governance Framework.
A worked bundle template
INCIDENT EVIDENCE BUNDLE — INC-2026-0142 ------------------------------------------------ Asset: Freezer F-07 (-80), Tier 1 Detected: 2026-02-14 02:07 (high-temp alarm, -68°C) Trigger threshold: -70°C sustained 10 min Detected by: Auto-alarm → on-call pager (R. Okafor) TIMELINE 02:07 Alarm fired, on-call paged 02:14 On-call on-site, confirmed compressor failure 02:16 PI + facilities notified (parallel) 02:19 Prioritized transfer list retrieved, backup F-12 confirmed at -81°C 02:24 Transfer of Priority-1 racks (A1–A4, C2) begun 02:38 Priority-1 (~900 vials) secured in F-12 02:55 Priority-2 material relocated; capacity reached 03:10 Facilities/vendor confirmed compressor part ETA ------------------------------------------------ ENVIRONMENTAL DATA: [export F-07temp0200-0400.csv attached] RTO TARGET / ACTUAL: 60 min / 31 min (Priority-1 secured) MATERIAL LOST: 0 (all irreplaceable material transferred) MATERIAL AT RISK: ~1,700 vials remained in F-07, temp held above -60°C until repair; no degradation threshold crossed VENDOR: Ticket #CS-88231, part ETA 6 hrs CAPA: CAPA-2026-019 (compressor age → replacement schedule) SIGN-OFF: Lab Mgr, 2026-02-14 09:30
The value of the template isn't any single field. It's that INC-2026-0143, when the network dies instead of the freezer, uses the exact same skeleton. The auditor sees one pattern. Your team files one way. And when you review incidents quarterly, you're comparing apples to apples.
How the pieces connect as the lab scales
At a small lab, one person often holds the whole framework in their head. They know which freezers are T1, they are the call tree, and they reconstruct the evidence from memory. It works until it doesn't — until that person is on vacation during the outage, or until the lab grows past what one person can reasonably track.
The transition point is usually around the second or third critical freezer, or the moment the lab takes on regulated or sponsored work where evidence has to be defensible. That's when the informal version starts to crack. Three things tend to break in sequence:
-
Tiering goes stale because new samples arrive and nobody re-tiers the freezer contents, so a T1 cohort ends up sitting in a unit that's only monitored to T3 standards.
-
Test cadence lapses because it's nobody's explicit job, and drills are the first thing dropped when the lab is busy.
-
Evidence fragments because different people document differently, and by the time you need to prove your response, the records don't line up.
The framework fixes this by making each of those a scheduled, owned, standardized obligation instead of a heroic individual effort. Tier reviews happen on a cadence tied to sample intake. Drills are calendared by tier. Every incident yields the same bundle. None of it depends on one person remembering.
This is where operational software earns its place — not as a gadget, but as the thing that holds the tier assignments, fires test-cadence reminders, captures the timeline as actions happen, and auto-attaches monitoring exports so the evidence bundle assembles itself instead of being reconstructed at 6 a.m. after a long night.
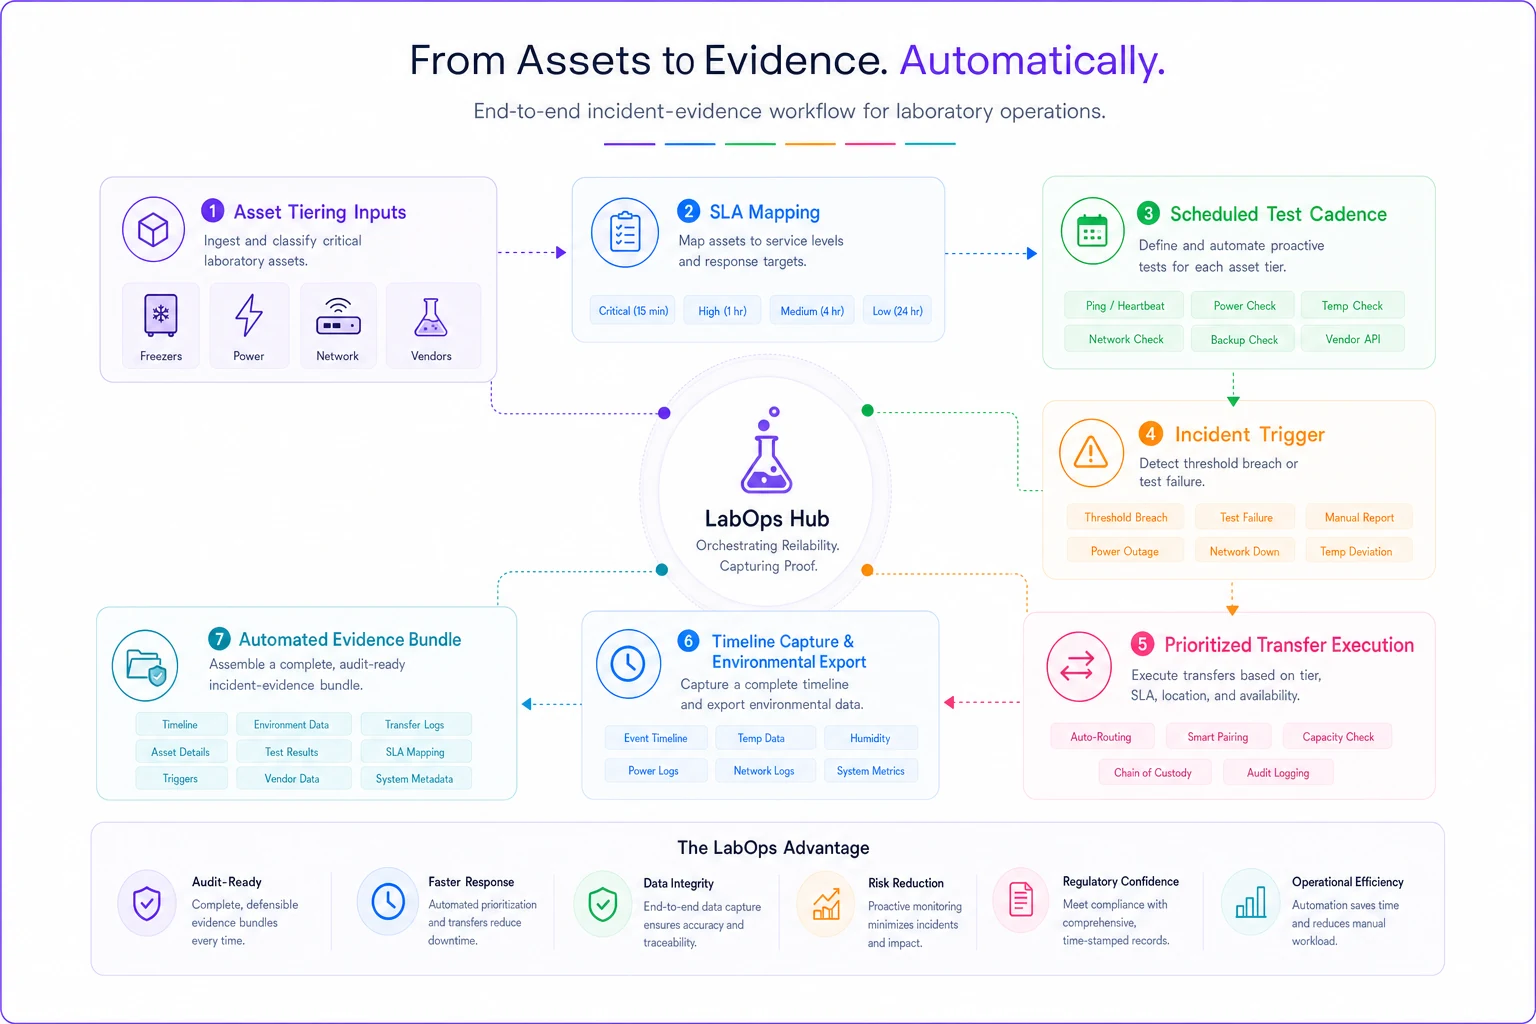
The point isn't automation for its own sake. A stressed person at 2 a.m. shouldn't also be responsible for remembering to document. The system should be capturing while they're acting.
When this level of framework makes sense — and when it doesn't
When it's worth it: You hold irreplaceable material, you do regulated or sponsored work, you have more than a couple of critical freezers, or you've already had one incident where the response was chaotic. Any of those and the full tiered framework pays for itself the first time it gets tested for real.
When it's overkill: A very small lab with only replaceable material, no regulatory exposure, and a single critical unit doesn't need four tiers and quarterly drills. Build the T1 essentials — one prioritized transfer list, one backup arrangement, one evidence template — and skip the rest until you grow into it. Bureaucracy that outpaces actual risk just gets ignored, which is worse than no plan at all.
Who should not simply copy this: Labs that would build the tables, print the documents, and then never run a drill. A framework that isn't tested is more dangerous than an honest "we don't have one," because it creates false confidence. If you can't commit to the cadence, don't pretend you have the SLA.
Pulling it together
Resilience isn't the freezer, the generator, or the vendor contract. Those are components, and most labs already own decent ones. What actually protects your samples is the layer that decides which components matter most, commits to a recovery target you've reserved the resources to hit, proves that target works on a schedule, and produces the same defensible record every time something goes wrong.
Build the tiers first, because everything else — the SLAs, the cadences, the transfer lists, the evidence bundles — inherits its priority from them. Get the tiering honest, keep it current as your samples change, and the rest of the framework has something solid to hang on.
The labs that recover well aren't the ones with the most equipment. They're the ones who decided, in advance and in writing, exactly what happens in the first ninety minutes.
Build the tiers first, because everything else — the SLAs, the cadences, the transfer lists, the evidence bundles — inherits its priority from them. Get the tiering honest, keep it current as your samples change, and the rest of the framework has something solid to hang on.
The labs that recover well aren't the ones with the most equipment. They're the ones who decided, in advance and in writing, exactly what happens in the first ninety minutes.
Ready to upgrade your lab operations?
Join 500+ labs using Labioly to save time, reduce errors, and enhance productivity and compliance.